

Make a modular felt trivet
 Related to yesterday's coaster project, here's a template for making a larger modular felt trivet. No sewing or gluing required. Connect as many pieces as you like to make bigger projects, too--placemats, a runner, or sew two pieces together for a pillow cover.
 Download the pattern here. Then print out as many sheets as you need, pin them to a piece of felt, and use a rotary cutter or X-acto knife to cut the slits in each shape. (Press hard to make sure you cut through both the paper pattern and the felt.) Then cut apart the shapes, adding the notches around the edges.
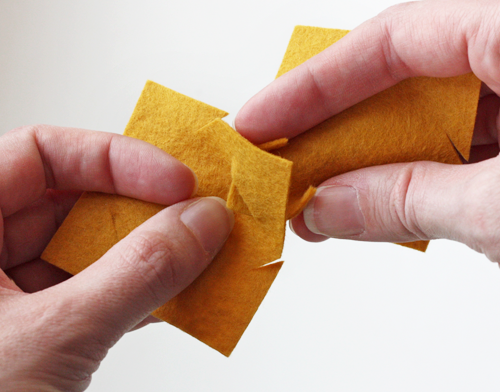 Begin locking pieces together by pulling the arrow-shaped tabs through the slots from the back through to the front side. Connect as many pieces as you like.
 To finish the trivet, trim off the excess felt around the edges and nip the points off the triangular tabs. Make a straight cut, or round them for a different look.
68 comments:
This is so neat!! It looks like it would be fun to make too. Thanks for the info!
The cutting is annoying but assembly is fun!
Gah! THIS is why I love felt. And leather! How cool would this be out of leather for a pillow! Thanks for the tutorials, very inspiring.
Leather! YES!!!
I like! A lot!!!
Mum
I really like this! Thanks for the tutorial and sharing both projects and templates! I am looking forward to trying this out!
Very, very cool. :)
I love this idea! Especially in one color. It would be nice to make a pillow cover out of it.
Oh man, my fingers are itching to try these. Do you have a good source for felt? I don't nkow that the fabric stores in my city would carry nice wool felt, but I'm reluctant to just order online without a recommendation.
You could ask Larissa Holland, who does lots with felt.
http://mmmcrafts.blogspot.com/
Also look at Joggles.com.
Wow that's absolutely great! Thanks for sharing!
These look like fun, can't wait to try them out. Thanks for the info!
These coaster templates are great! Thanks for the freebies.
If you're looking for a source for 100% wool felt for this project, please check out FeltOnTheFly.etsy.com You'll be able to wash coasters made from my wool felt (gently of course) with no ill-effects. Also, hot things won't melt wool felt. And it will protect surfaces better. Just sayin!
Great post! I'll be working on some wool felt coasters myself : )
The orange and gray combination.. I just love it.
looks absolutely lovely!
The colors are lovely and so is the design. Though the finished product looks like a complicated design, your steps to do it resolves the complexity. Lovely again!
Resmi
What a GREAT project!!!! That is so cool and so simple. Love the graphic look of it- And to think what you can do with the colors... Want to start it NOW :-)
Cheers, Marlene
this is perfect!!!
Thank you so much for this post. I want to let you know that I posted a link to your blog in CBH Digital Scrapbooking Freebies, under the Page 4 post on Mar. 14, 2012. Thanks again.
This is genius and makes me want to start right now!
I love this project. And where did you get that cup and saucer? I love the pattern (is that your design?).
I agree, I love the pattern on the cup and saucer. What is it?
This is so pretty!!! I have so much felt that needs to be used, and this would be perfect!
This is so cool! It looks like it could be reversible, too. I'm definitely going to make one of these for the dining area in my new apartment.
The little cups are vintage, Pontesa Spanish Crown Ironstone.
This is definitely cool. I also love the cups that are also in the picture. This coaster project or place-mat option or even runner option is cool there are so many options to with this technique. It also has a 3D effect.
wondrous, love it. All about the colour, the repetition and the shapes. I've linked to you, hope you don't mind, at http://thejoyofsew.blogspot.com/
S x
Brilliant, looks like a bought one.
This is so inspirational in so many ways. Thank you Jess!
I love this! I can't wait to try it!
http://www.etsy.com/shop/sweeteststrawberry
Truck Injury Attorney, thanks. You and all your spam commenter friends are really peppering my blog with compliments these days. I can hardly keep up with you! Good thing Blogger's spam catcher helps weed out most of you. I'll let your comment stay, since I feel sorry for attorneys who have been injured by trucks.
You're too kind!! At least what the "attorney" said made sense! That's more than you can say about most spam comments. But I do think the spam catcher is slipping these days. :(
Um, wow! This is totally brilliant! I can't wait to incorporate this idea into some items for my home. Thank you so much for sharing!
Wow !! Super :)
Sigo el blog desde Tenerife,Islas Canarias, y es genial. Gracias
pretty!
Amanda
Jessica- OMG!! This is awesome!! and Betz...leather...even more awesome!!!! So Excited!
Just stopped playing the colourgame to start doing this felt project! Thank's for the idea and all the other you have already shared in your blog.
This is absolutely brilliant and I'm so grateful for your instructions and pdf! I might be a little crazy but I think I'd like to attempt to make a rug with this technique. Thank you!!
This is amazing...off to get my felt now :)
I made a pillowcase out of it posted in my blog http://fadenspielundfingerwerk.blogspot.de/ with a link to your one. It was a nice weekend project, thank's to you.
Karin, FANTASTIC!!
With another little triangular clip in the center of one side of each pair of flaps, you'd have lips for Valentine's day.
LOVE THIS!
I would love to turn this into a placemat. Any ideas on how to make it larger?
Sure, just cut out more felt pieces and keep connecting them until it's the size you like.
So pretty!
I can't wait to make myself a set of placemats using your technique. Come to think of it, this would be a perfect project to do with my 11 year-old over summer break. Just gorgeous!
What a clever idea!
Oh I love the green! My Fav color!!!! Thanks for Posting this awesome pattern! <3
amazing. these are just gorgeous!! :) lisa
How would you go about washing this? ...I want to make it, but I know it would end up dirty pretty quickly in my household of five!
Good question. Wool felt won't wash well. Maybe you need a leather version! Go to a thrift store and buy a bag or vest or something you can chop up.
Love this slick modern look!
This is gorgeous! I can't wait to make it myself!
Hola me encanta el tutorial. Saludos desde Spain-Andalucia-Granada
This looks great! I want to try it :-)
I was wondering...I read a few comments from people saying it would look great on a seat cover or as a pillow. How would you do that? Would you sew the pieces together? I think it's a great idea for a pillow but I'm a newbie to DIY and don't know how I could do that. Thanks.
Yep, I guess I'd make two felt pieces for the front and back of a pillow and sew them together.
This looks so amazing. I just went and bought my felt, but when I tried to download the pdf the link just sends me to the google search home page. What am I doing wrong? Can someone give me the correct link, please? Thanks, I am dying to make this.
Hi Anonymous,
Apologies! As of yesterday, links aren't working correctly for some reason. I'm in contact with my web programmer and hosting company and we're trying to get things fixed.
In the meantime, email me and I'll send you the PDF!
I gave this a go and made a rather swish (if I might say myself)table runner! Thank you for the tutorial it's ace.
would it be possible to do this with other material? like maybe old t shirts?
It would, but t-shirts are thinner than felt so the result will be a lot more floppy and less structural/3D. I don't think it would have quite the same effect.
Expand the dimensions and this would be lovely to put on your table for your dishes. You could even do different colors for different holidays. Great tutorial!
I love this idea and have just bought materials for making place mats. I just looked at the pattern for the first time and realised how inefficient it is! Might I suggest a redesign that doesn't waste all those triangles around the edge? xx
Yep, I know... it's on my list of things to do!
Good idea, I like it. Seems like a leather punch would work for cutting the slits, they look like a chisel, sort of.
...and a table runner would be nice in a diagonal rainbow...
Post a Comment